Blog
INTRODUCTION TO GOOGLE SEARCH CONSOLE
If the term “Google Webmaster Program” sounds like a bell for you then you may already have an idea of what the Google Search Console is. Because Google Webmaster Tools (GWT) has become a valuable resource for so many different types of people apart from webmasters — marketing practitioners, SEOs, designers, business owners, and app developers, to name a few— Google decided to change its name in May 2015 to be more inclusive of its diverse user group.
Whether you don’t know about GWT or the Google Search Console, let’s go back to square one. Google Search Console is a free service that lets you learn a lot about your website and the people that visit it. You can use it to find out things like how many people visit your site and how they find it, whether more people visit your site on a mobile device or desktop computer and which pages are the most popular on your site. It can also help you find and fix errors on the website, submit a sitemap, and create and check a file called robots.txt.
Hey there, man! Welcome to other content brought to you by www.websitesadvice.com. Are you ready to start taking advantage of everything Google Search Console has to offer? Let’s just do this.
HOW TO ADD AND VERIFY A SITE IN GOOGLE SEARCH CONSOLE
If you’re new to Google Search Console, you’ll need to connect and check your site(s) before you can do anything else. Adding and checking your site in the Search Console proves to Google that you are either the owner of the domain, the webmaster, or any other authorized user. After all, Search Console gives you all kinds of incredibly detailed information and insights about the success of the app. Google doesn’t want to give that kind of information to anyone who asks for it.
Adding a location to the Search Console is a very simple procedure. Sign in to your Search Console account first. When signed in, you will see a box next to the red button that says “Add Assets.”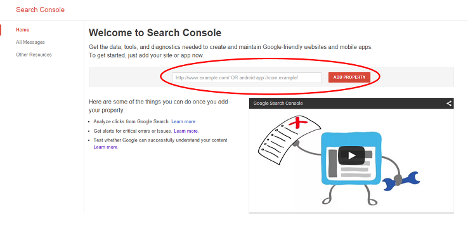
Type the site URL you are attempting to add in the box and click “Add Address.” Congratulations, your site has now been added to your Search Console account!
You’ll then be asked to check your website. There are a couple of different ways to go about this. Which method will work best for you depends on whether you have experience working with HTML, whether you have access to upload files to the site, the size of your site, and whether you have other Google programs connected to your asite or not. If that sounds overwhelming, don’t worry –we ‘re going to help you find out.
HOW TO ADD AN HTML TAG
This method of verification is best suited for users and site owners who have experience working with HTML code.

Select “Manage Property” from the dashboard of the Search Console, then select “Verify this property.” If the HTML Tag” option does not appear under “Recommended Method then click on the “Alternate Methods” tab and select “HTML tag,” which will provide you with the HTML code you will need to verify.

Copy the code, and use your HTML editor to open the file for the homepage of your site. In the < Head > portion of the HTML code, paste the code provided within. If your site already has a meta tag or other code in the section < Head >, it doesn’t matter where the verification code is placed in relation to the other code; it just has to be in the section < Head >. If your site does not have a section< Head >, you can build one for site verification purposes.
Once you’ve added the verification code, save and publish the updated code, and open the homepage of your site. From there, view the source code for the site. The verification code is to be seen in the segment < Head >.
Once you are sure that the code has been added to the homepage of your site, go back to the Search Console and click “Verify.” Google will then check the verification code for your site. If you find the code you will see a screen that will let you know that the site has been verified. If not, information will be provided on the errors it has encountered. When Search Console has reviewed your site, do not delete the verification code from your account. If the code is deleted it will unverified your site.
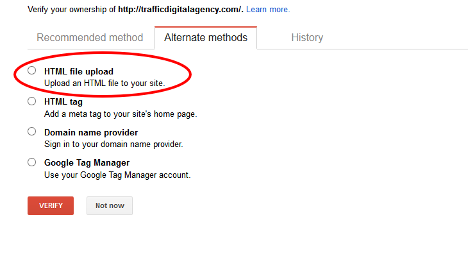
HOW TO UPLOAD AN HTML FILE
To use this method files must be uploaded to the root directory of a site. Select “Manage Site,” then “Verify this Site from the Search Console dashboard. If “HTML file upload” is not specified under “Recommended method,” it should be listed under “Alternate method” tab.
You will be prompted to download an HTML file when you select this method Download it then upload it to the location specified. Do not make any changes to the file content or filename; the file must be kept exactly the same. When updated, the site will not be able to be verified by Search Console.
After uploading the HTML file, go back to the Search Console and click “Verify.” If everything has been uploaded correctly, you will see a page which will let you know that the site has been checked.
Once that process has been used to validate your site, do not remove the HTML file from your site. That will make your site unverified.
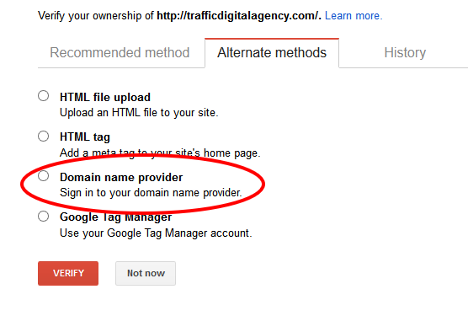
HOW TO VERIFY USING DOMAIN NAME PROVIDER
The domain name provider is the organization from which you have acquired a domain, or where your website is hosted. When verifying using your domain name provider, it not only proves that you are the main domain owner but also that you own all the subdomains and subdirectories associated with it. If you have a large website this is an excellent option.
Select “Manage Site from the Search Console dashboard, then select “Verify this Site.” If you do not see the option “Domain Name Provider” listed under Recommended Method look under the tab “Alternate Method.”
You will be asked to select your domain name provider from a list of widely used providers, such as GoDaddy.com, by choosing “Domain name provider” If your provider is not on this list, select “Other,” and you will be given instructions on how to build your provider’s DNS TXT record. If your provider doesn’t have a DNS TXT record, you’ll have the option to create a CNAME record instead.
HOW TO ADD GOOGLE ANALYTICS CODE TO YOUR WEBSITE
If you’re already using Google Analytics (GA) to track the traffic on your site, this might be the easiest option for you. But first, you will need to be able to check the HTML code of the site to ensure that the GA tracking code is placed inside the < Head > section of the code of your webpage, not in the < Body > area. If the GA code is not already in the < Head > field, for this method to work, you will need to pass it in there.
Select “Manage Site,” then “Verify this Site” from the Search Console dashboard. If you do not see the “Google Analytics Tracking Code” option under the “Recommended Method” tab, look under the “Alternate Method” tab. Once you select “Google Analytics tracking method,” a set of instructions will be given for you to follow.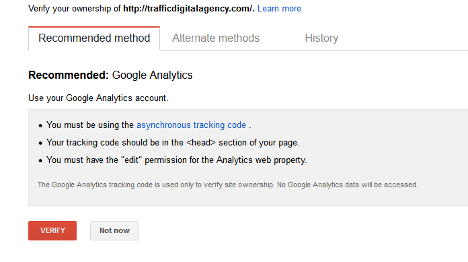
Once your site has been verified, do not remove the GA code from your site, or it will cause your site to become unverified.
HOW TO USE GOOGLE TAG MANAGER
If you are already using Google Tag Manager (GTM) for your website, it could be the best way to verify your website. If you are going to try this method, you need permissions allowed for your account in GTM to be “View, Edit, and Manage.” Look at your site’s HTML code before attempting this method to ensure the GTM code is put directly after the < Body > tag on your site.
From the Search Console dashboard, select “Manage site,” then “Verify this site.” If you don’t see the “Google Tag Manager” option listed under “Recommended method,” it should appear under “Alternate method.”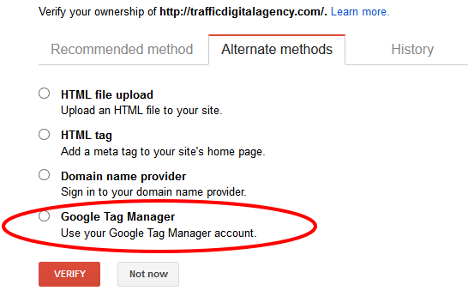
Select “Google Tag Manager” and click “Verify.” When you enter the code for the Google Tag Manager, you should see a screen that will let you know your site has been verified. When your site has been tested, don’t delete the GTM code from your site or your site will be unverified.
LINKING GOOGLE ANALYTICS TO GOOGLE SEARCH CONSOLE
It may seem that Google Analytics and the Google Search Console provide the same details, but there are some important differences between these two Google products. GA is more about who is visiting your site— how many tourists you have, how they get to your site, how much time they spend on your web and where your visitors (geographically speaking) come from. Google Search Console, on the other hand, is more focused on more internal information— which leads to you if there are vulnerabilities or other problems on your site and which keyword keywords your site appears for in the search results. Additionally, Analytics and Search Console don’t handle all details exactly the same way, so even if you assume you ‘re looking at the same chart, you might not get the exact same information in both places.
To get the most out of the information Search Console and GA provide, you can connect accounts together for each. With these two tools connected, the data from both sources will be combined to send you additional reports that you will only be able to access once you have done so. Let ‘s start, then:
Has your location been added to Search Console and verified? If not, you’ll have to do that before you can move on. Tap on the site you are attempting to link from the Search Console dashboard. You will see a gear icon in the upper righthand corner. Click on it, then pick “Google Analytics Property.”
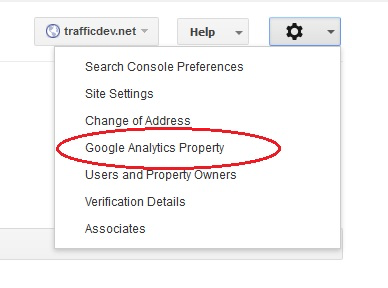
This will place you on a list of Google Analytics accounts linked to your Google account. All you need to do is pick the GA account you like, and click “Save.” Simple, right? That is all it takes for Search Console and Analytics to get the most out of it.
HOW TO ADD A SITEMAP
Sitemaps are files that provide important information to search engines and web crawlers about how your site is structured and what kind of content is available there. Sitemaps can include metadata, including site details such as image and video content information, and how often the site is updated.
By submitting your sitemap to the Google Search Console, you make it easier for Google to do its job by making sure they have the details they need to do their job more effectively. Nevertheless, uploading a sitemap is not compulsory, so if you don’t submit a sitemap, the account will not be penalized. But there is definitely no risk in sending one, particularly if your site is very new and not many other sites connect to it, if you have a very large website, or if your site has a lot of pages that aren’t thoroughly linked together.
Your site needs to be installed and checked in Search Console before you can upload a sitemap to Search Console. If you haven’t done that already, then go ahead and do it now. Select the site you wish to submit a sitemap for from your Search Console dashboard. On the left you will see an option called “Crawl.” Under “Crawl,” an option marked with “Sitemaps” will appear.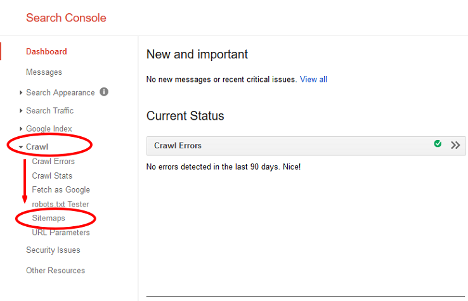
Click on “Sitemaps.” In the upper right corner, you can find a button labelled “Add / Test Sitemap.”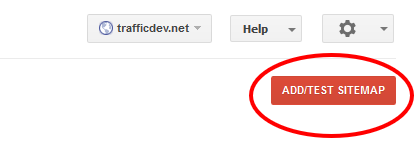
This will pull up a box with a space in which to add text.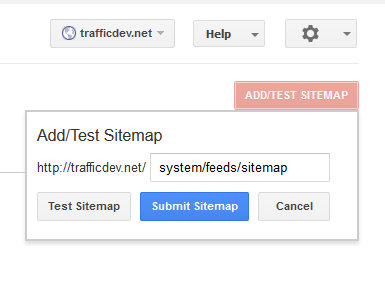
Type “System / Feeds / Sitemap” in that box and hit “Send Sitemap.” Congratulations, a sitemap has now been submitted!
HOW TO CHECK ROBOTS.TXT FILE?
Having a website doesn’t necessarily mean you want the search engines to crawl all of its sites or folders. If there are certain things on your site that you would like to keep out of search engines, this can be accomplished using a file called robots.txt. A robots.txt file placed in your site’s root tells search engine robots (i.e., web crawlers) what you are doing and does not want to be indexed using commands known as the robots Exclusion Standard.
It is important to note that in keeping things away from web crawlers, robots.txt files are not necessarily guaranteed to be 100% effective. The commands in robots.txt files are instructions, and although they will be accepted by the crawlers used by credible search engines like Google, it is entirely possible a less reputable crawler won’t. It’s also entirely possible to interpret commands differently for different web crawler. Also, robots.txt files won’t stop other websites from linking to your content, even if you don’t want to have it indexed. If you want to check your robots.txt file to see exactly what it is and does not allow, log in to the Search Console and select the site you want to check for which robots.txt file. Have you not already added your site to Search Console or checked it? Have this done first.
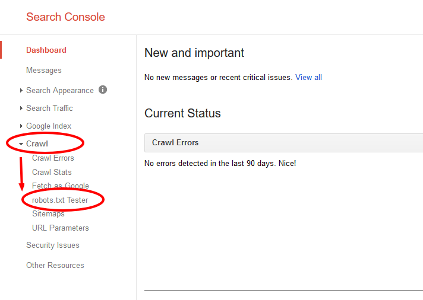
On the left-hand side of the screen, you’ll see the option “Crawl.” Click on it and choose “robots.txt Tester.” The Robots.txt Tester Tool will let you look at your robots.txt file, make changes to it, and it alert you about any errors it finds. You can also choose from a selection of Google’s user-agents (names for robots/crawlers) and enter a URL you wish to allow/disallow, and run a test to see if the URL is recognized by that crawler.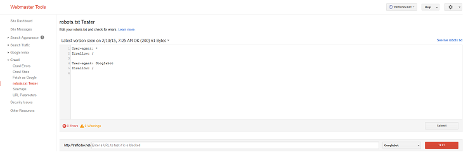
If you use Google’s robots.txt tester to make any changes to your robots.txt file, the changes won’t automatically be reflected in the robots.txt file hosted on your site. Luckily, updating it yourself is fairly easy. Hit the “Submit” button below the edit box in the lower right corner once your robots.txt file is as you want it to be. That will allow you to download your updated robots.txt file. Just upload that in the same directory where your old one was (www.example.com/robots.txt) to your website. The domain name will obviously change, but your robots.txt file should always be named “robots.txt” and the file should be saved in the root of your domain, not www.example.com/somecategory/robots.txt.
Hit “Verify Live Version” back on the robots.txt test tool to make sure the correct file is on your website. Anything right? Good one! To let Google know you’ve updated your robots.txt file, click “Submit Live Version” and they should crawl it out. If not, reload your site with the new robots.txt file, and try again.
FETCH AS GOOGLE AND SUBMIT TO INDEX
When you’ve made major improvements to a website, Google’s manual registration is the quickest way to get the updates indexed. It will allow any adjustments that are made to items like on-page content or title tags to appear as soon as possible in search results. Signing into Google Search Console is the first step. Next, pick which page to submit. If the website does not use the prefix ‘www.’ then ensure that you press the entry without it (or vice versa).
On the left-hand side of the screen, you should see a “Crawl” option. Click on it, then choose “Fetch as Google.”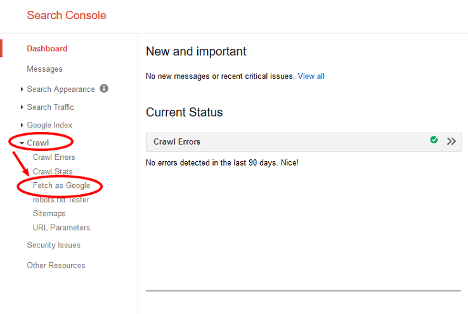
Clicking on “Fetch as Google” is supposed to bring you to a page that looks like this:
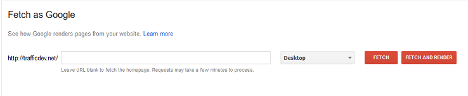
If you need to get the whole website (such as after a big site-wide redesign, or if a lot of remodeling has been done on the homepage) then leave the center box empty. Otherwise, use it to enter the full address of the indexed page you need, like http:/example.com/category. Click on the “Fetch and Render” button after entering the page you need indexed. Fetching could take a couple of minutes, depending on the number / size of pages to be fetched. After the indexing has finished, there will be a “Submit to Index” button that appears in the results listing at the bottom (near the “Complete” status). You will be given the option to either “Crawl Only This URL,” which is the option you want if you’re only fetching/submitting one specific page, or “Crawl This URL and its Direct Links,” if you need to index the entire site.
Tap on this, wait to complete the indexing and you’re done! Google has now sent its search bots to index the new content on your website, and the updates are due to appear in Google in the coming days.
WHAT ARE SITE ERRORS IN GOOGLE SEARCH CONSOLE?
No one wants something wrong with their website, but sometimes you may not know that there is a problem until somebody tells you. Instead of waiting for someone to contact you about an issue, Google Search Console will be able to inform you directly of any errors found on your site. When you want to search a website for internal errors, pick which website you want to review. Tap “Crawl” on the left-hand side of the screen, then pick “Crawl Errors.”

You will then be taken straight to the Crawl Errors tab, which displays any website or URL errors detected by Google’s bots when indexing the tab. They ‘re going to see something like this: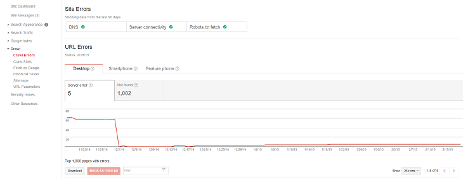
Any found URL errors should show up at the bottom. Tap on any of the errors for a description and further descriptions of the error found. We hope this guide would have been helpful in getting to know you with the Google Search Console. Now that everything has been set up and checked, all the knowledge that Google Search Console has for you will start to take in.
Thank you so much and we are hoping to see you again. Stay safe!