INTRODUCTION TO GOOGLE ANALYTICS
It’s no secret that having an effective website is hugely important in today’s day and age. One invaluable tool that helps you measure your digital performance is Google Analytics.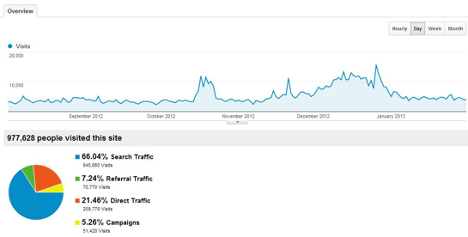
If you don’t know what Google Analytics is, don’t have it installed or installed on your website, but never look at your results, then this article is for you. Although many have difficulty believing, there are still websites that do not use Google Analytics (or any analytics, for that matter) to calculate their traffic.
Hi there! Welcome to another installment to our SEO SERIES. In this content, we’ll look at Google Analytics from the viewpoint of the absolute beginner. Why you need it, how to get it, how to use it and how to fix common issues.
WHY GOOGLE ANALYTICS IS ESSENTIAL?
Have you got a blog? Do you have a Website that is static? If the answer is yes, whether it’s for personal or commercial use, then you need Google Analytics. Here are just a few of the many questions you can answer using Google Analytics about your web site.
- How many people visit my website?
- Where do my visitors live?
- Do I need a mobile-friendly website?
- What websites send traffic to my website?
- What marketing tactics drive the most traffic to my website?
- Which pages on my website are the most popular?
- How many visitors have I converted into leads or customers?
- Where did my converting visitors come from and go on my website?
- How can I improve my website’s speed?
- What blog content do my visitors like the most?
Google Analytics will answer many, many additional questions, but these are the ones that are most important to most website owners. Now let’s look at how you can make Google Analytics accessible on your website.
INSTALLING GOOGLE ANALYTICS
Firstly, you need an account with Google Analytics. If you have a main Google account that you use for other services such as Gmail, Google Drive, Google Calendar, Google+ or YouTube, then you should use that Google Account to set up your Google Analytics. Or you’ll have to make one new. This should be an account with Google that you plan to keep forever and that you only have access to. You can always give other drivers on the road access to your Google Analytics but you don’t want anyone else to have full control over it.
Don’t let anyone (your web designer, web developer, web host, SEO guy, etc.) create the Google Analytics account of your website under their own Google account, so that they can “manage” it for you. If you’re parting ways with this guy, they’ll take your Google Analytics data with them, and you’ll need to start all over.
SETUP YOUR ACCOUNT AND PROPERTY
Once you have a Google account, go to Google Analytics and press the Google Analytics button to sign in. Then you’ll be greeted with the three steps you need to take to set up Google Analytics.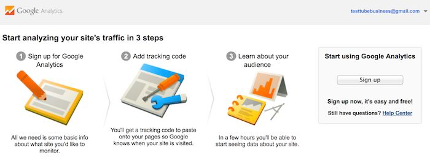
After clicking on the Sign Up button, you’ll fill out your website information.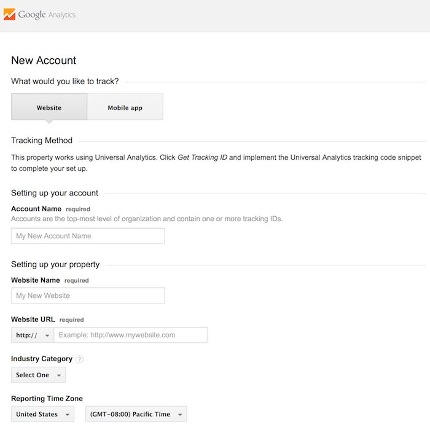
Google Analytics offers you hierarchies for managing your database. Within a single Google account, you can have up to 100 Google Analytics accounts. Under one Google Analytics account you can own up to 50 website assets. Under one website property you can have as many as 25 views.
Here are a few scenarios.
SCENARIO 1: If you have one website, you need only one Google Analytics account with one property on the site.
SCENARIO 2: If you have two websites, for example one for your company and one for your personal use, you will want to build two accounts, calling one “123Business” and one “Personal” Then, under the 123Business account, you can set up your business website and your personal website under your Personal account.
SCENARIO 3: If you have two websites, for example one for your company and one for your personal use, you may want to create two accounts, calling one “123Business” and one “Personal” Instead, under the 123Business account, you can set up your business website and your personal website under your Personal account.
SCENARIO 4: If you have multiple businesses but less than 50, and each of them has one website, you may want to place them all under a Business account.
There are no right or wrong ways to set up your Google Analytics account— it’s just a matter of how you want your pages to be structured. You can also rename your properties or accounts down the road. Notice that you cannot move a property (website) from one Google Analytics account to another— you would have to set up a new property under the new account and remove the historical data from the original property that you received.
For the absolute beginner’s guide, we’re going to assume you have one website and only need one view (the default, all data view. The setup would look something like this.
You will have the option underneath to configure where your data can be shared with Google Analytics.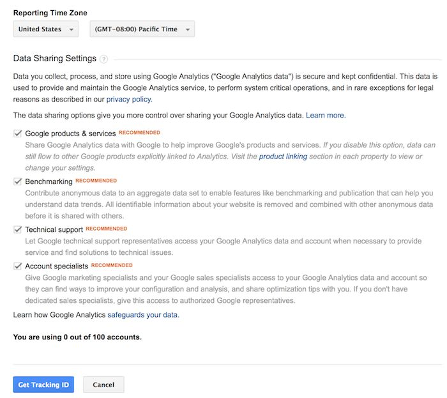
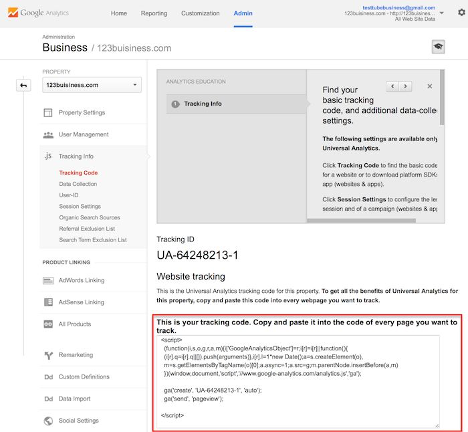
INSTALL YOUR TRACKING CODE
Once you’re done, you’ll click on the Get ID Tracking button. You’ll get a popup of the terms and conditions of Google Analytics, which you must agree to. You’ll then obtain your Google Analytics code.
Alternatively, if you have WordPress on your own domain, you can use Yoast’s Google Analytics plugin to easily install your app, no matter what theme or framework you use.
If you have a website built with HTML files, the tracking code is applied to each of your pages before the </head > tag. Using a text editor program (such as TextEdit for Mac or Notepad for Windows) you can do this and then upload the file to your web host using an FTP program (such as FileZilla).
SET YOUR GOALS
You will want to configure a small (but very useful) setting in the profile of your website on Google Analytics after you have installed your tracking code on your web site. This is the setting of your Goals. You can find it by clicking the Admin link at the top of your Google Analytics button and then clicking on Goals under the View column of your website.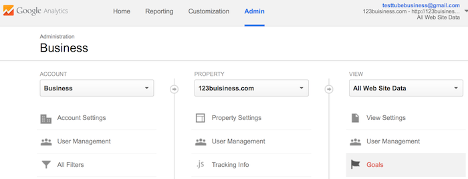
Goals will tell Google Analytics when your website has seen something important happen. For example, if you have a website where you generate leads through a contact form, you’ll want to find (or create) a thank you page that ends when visitors submit their contact details. Or, if you’ve got a website where you’re selling products, you’ll want to find (or create) a final thank you or confirmation page for visitors to land once a purchase is complete.
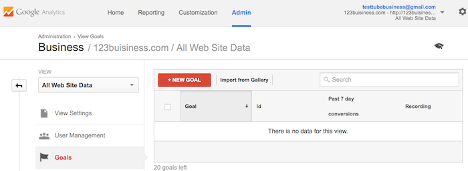
In Google Analytics, click on the NEW GOAL BUTTON.
You must pick the Custom option and click the Next Step button (unless one of the other options is more appropriate to your website).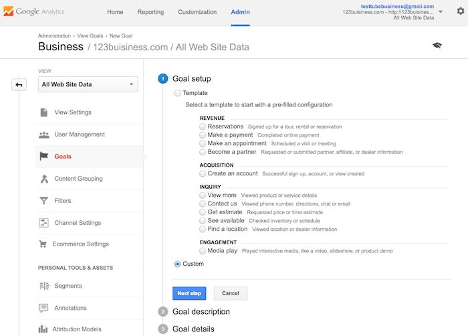
You’ll name something you remember about your target, select Destination and then press the Next Move button.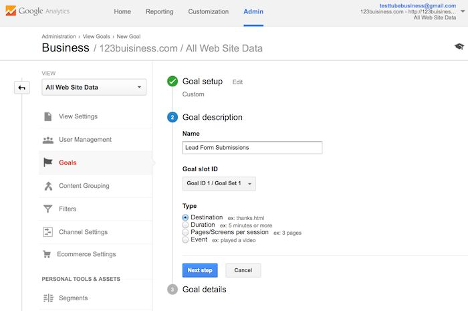
You must enter the URL of your thanks or confirmation page in the Destination field after the.com of your website, and change the drop – down to “Begin with.”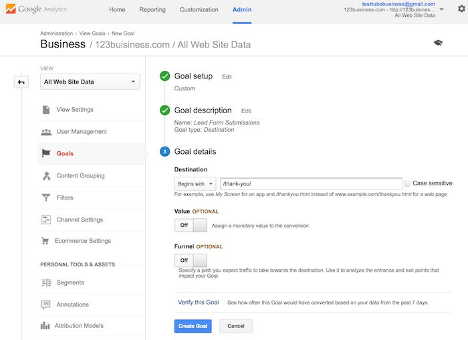
You will then toggle the value for that conversion and enter a specific dollar value (if applicable) and click Create Goal to complete the setup. You can follow these steps again if you have other similar goals / conversions that you would like to track on your web site. Up to 20 targets can be created on your website. Make sure the ones you create are extremely important to your business. These goals (for most companies) include submissions to the lead form, sign – ups to the email list and completions of purchases. Your targets may vary depending on your website and its purpose.
SETUP SITE SEARCH
One feature that you can set up really quickly is Site Search which will give you valuable data down the road. This is for every page that has a search box on it, such as the search box at the top of our site.
Next, run a web – site search. Then keep open the tab. You ‘re going to need the URL for moment. Go to your Google Analytics Admin screen again, and click on View Settings in the User section.
Scroll down and turn it to On until you see Site Settings.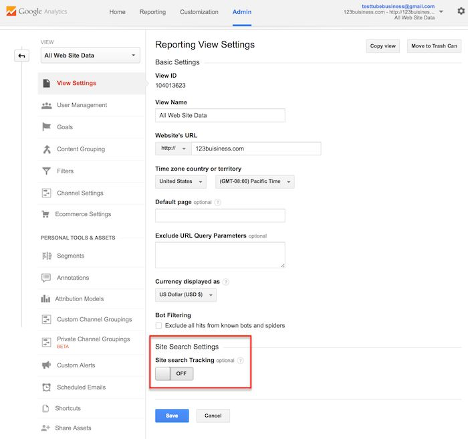
Look back at your URL for your search results. Enter the query parameter (usually s or q) and click Save.Look back for your search results into your URL. Type the parameter of the query (usually s or q), and press Save.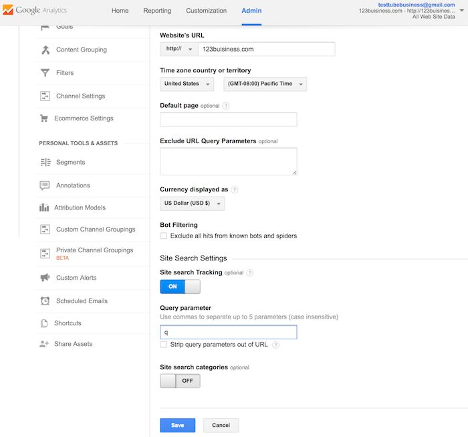
This will allow Google Analytics to track any searches performed on your website so that you can learn more on specific pages about what your visitors are finding.
VIEW GOOGLE ANALYTICS DATA
Once you get data in Google Analytics, you can start learning about traffic on your website. You will be taken to your Audience Overview report each time you log in to Google Analytics. Alternatively, if you have more than one website, you will be taken to your list of websites to choose from, and then transferred to that website’s Audience overview report. This is the first of over 50 reports that Google Analytics offers to you. These reports can also be accessed by clicking on the Reporting link at the top.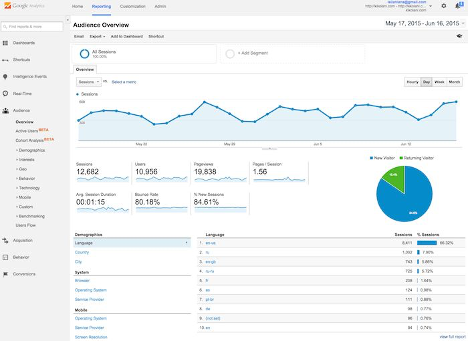
STANDARD REPORT FEATURES
Most of the standard reports should look similar inside Google Analytics. To move to different websites within all of your Google Analytics accounts, you can click on the drop – down arrow next to your website at the top right. Or you can top-down click the Home button.
You can click on the dates in the chart at the top right to adjust the date range for the data that you are viewing. In order to display your data, you can also check the Comparison box to comparison your data from one date range (such as this month) to a previous date range (such as last month).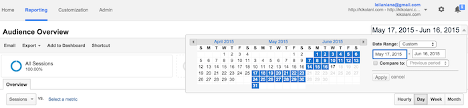
To get more information, you can swing over a variety of areas in your reports on Google Analytics. For example, in the Audience Overview you will be given the number of sessions for a given day by hovering over the line on the graph. Hovering over the metrics below the graph tells you what each means.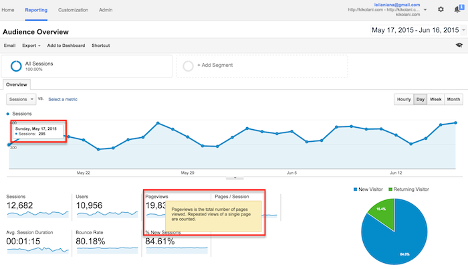
Under the key metrics, you’ll see reports that you can turn to show your visitors’ top ten languages, countries, cities, browsers, operating systems, service providers and screen resolutions.
To see the full reports, you can click the full report link at each. Or click on any of the top ten links for more information. Clicking on the United States in Countries , for example, will take you to the full Position Study, which focuses on visitors from states within the US.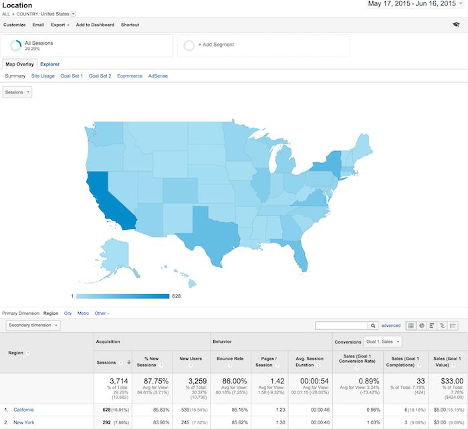
In this view, to see the number of visitors from that state, you can hover over each State. To learn more about each metric you can scroll down to the table and swing over each column name.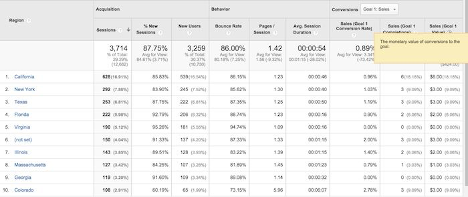
To see visitors from cities within the state, you can also click on the name of each State. Indeed, whenever you see a clickable link or a ? You can click on it next to something, or hover over it to learn more. The deeper you immerse yourself in analytics, the more interesting information you find.
We hope you’ve enjoyed this introduction to Google Analytics for beginners. If you’re a beginner and have a burning questions, please ask in the comments. We’ll be happy to help!
Thank you so much and stay safe!
Like!! I blog frequently and I really thank you for your content. The article has truly peaked my interest.
Thank you ever so for you article post.
Thanks for fantastic info I was looking for this info for my mission.
Thanks so much for the blog post.