When I first came across foreign-sounding words like Domain, SSL Certificates and Hosting, I almost gave up the idea of creating a WordPress website. Luckily, the process wasn’t as difficult as I was afraid. This is the tutorial that I wish I had when I started. It’s a complete beginner’s guide for people with no prior web design experience. It contains step-by-step screenshots, accompanied by clear instructions, showing how to set up a new WordPress site on SiteGround. The completion of this tutorial will give you a professional website within 20 minutes.
Quick Note: If you get stuck at any point during this tutorial, SiteGround live chat is accessible from the top right corner of the SiteGround website (under ‘Help’). They have trained support staff on-hand to help beginners through this exact process. Once you have signed up, chat support is available via the ‘Support’ tab on the menu.
SELECT A HOSTING PLAN AT SITEGROUND
A website host provides space on a computer server to store your website files so that your website can be accessed on the Internet 24/7.
The StartUp and GrowBig plans are suitable for beginners. The main difference between these is that the GrowBig plan allows you to host an unlimited number of websites, while the StartUp plan only allows one. There are a few other differences, such as the GrowBig Plan is slightly faster. The StartUp plan is fine for most beginners.
2. SELECT A WEBSITE NAME
The name of the website, such as www.yourwebsitename.com, is called a domain.
Type the name of the website you want. Others have already purchased several domain names, so your first choice may no longer be available. Most of the one-word domains are already gone.
Choose a domain extension (the end of the name of your website, such as.com). If you’re hoping to reach a global audience,.com is recommended as its most common and memorable. Alternatively, you may want to use.org or.net (derived from ‘organization’ and ‘network’). If your audience is in a single country, a country-specific domain, such as.co.uk, may be appropriate (country-specific domains are more expensive).
3. ENTER YOUR HOSTING DETAILS
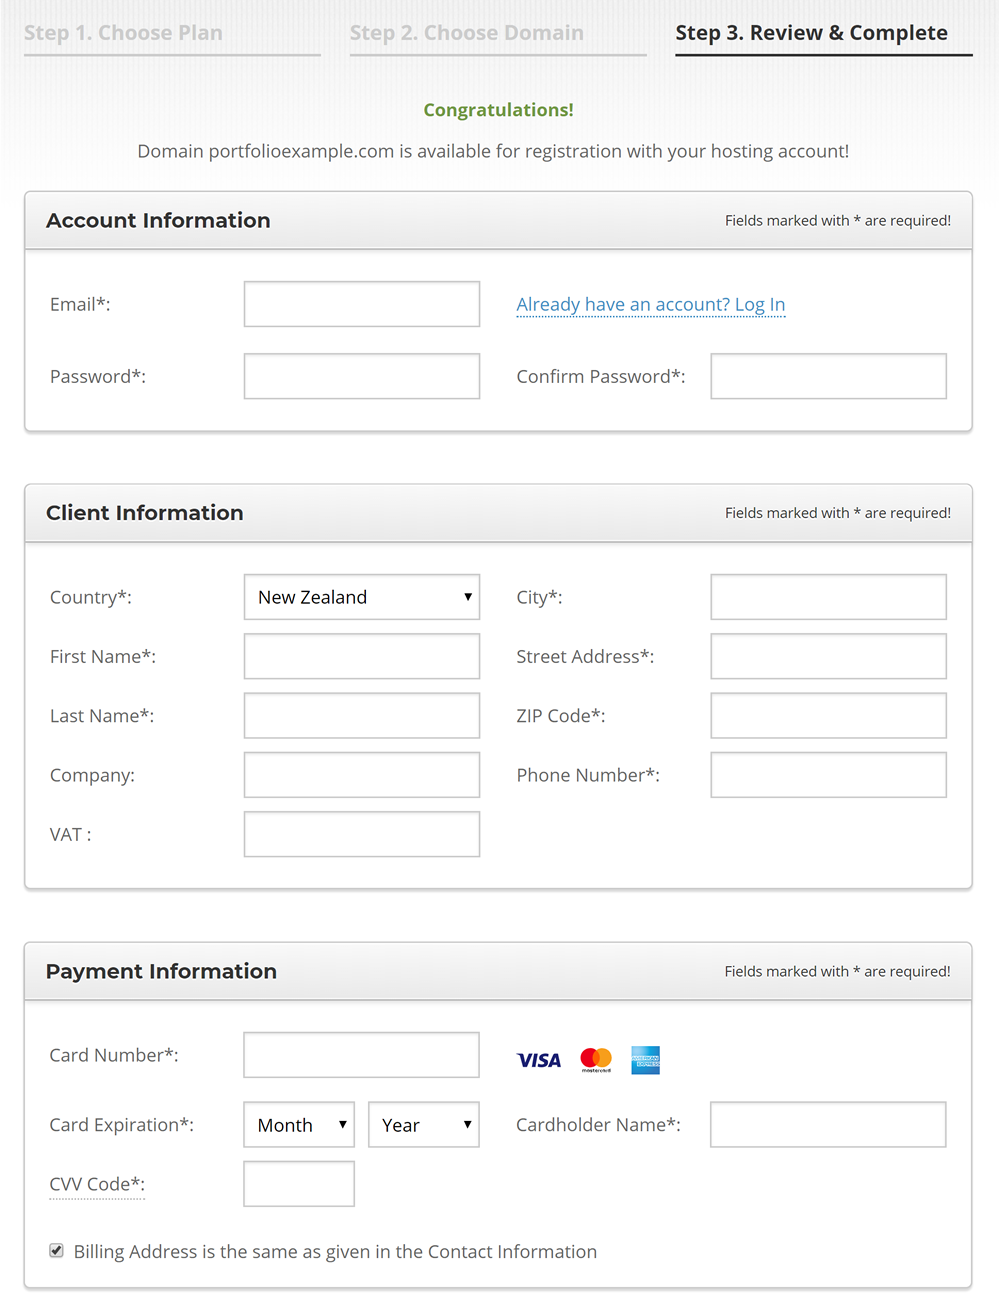
Please enter your email address and create a password (these are your login details for SiteGround – write them down). Then enter your contact information and payment details. If you are under the age of 18, please seek parental permission before entering your credit card details.
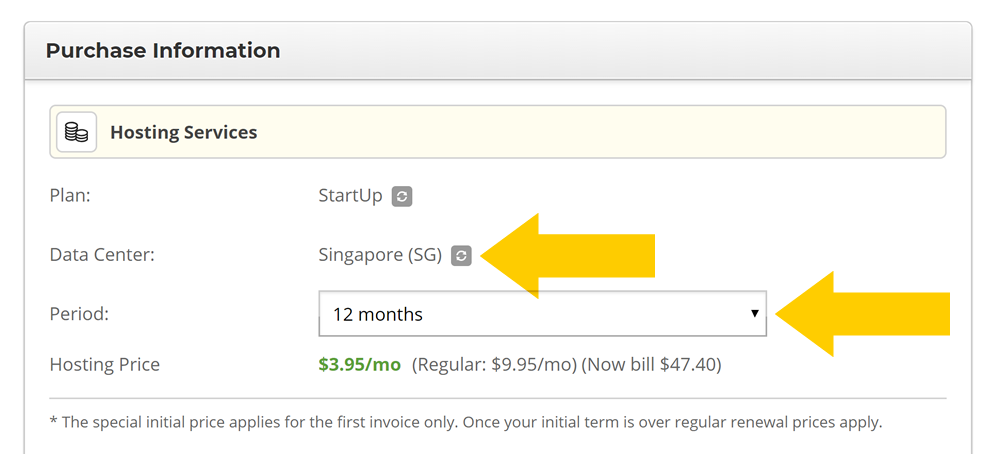
Choose the location of the data center that is closest to your audience. SiteGround is one of the few hosting companies to offer data center locations in more than one country (current locations include Chicago, Amsterdam, Singapore and London). Selecting a SiteGround data center located closest to most of your audience can make your website load a fraction faster for these people. SiteGround hosting is fast, no matter where, so this isn’t too crucial. If your audience is worldwide, or none of the locations are close to your audience, it doesn’t matter what you choose.
IMPORTANT: Select the duration of the hosting. The discounted price is only paid in advance for the chosen period of the invoice. For example, selecting one month means that the discounted rate applies only for that month, with the second month being renewed at a regular price. The one-month plan also has a set-up fee, making it the most expensive option in the long term. Selecting 12 months, on the other hand, avoids the set-up fee and applies the discounted rate for the full year. Selecting 36 months ensures that you have access to the discounted SiteGround pricing for the longest period. SiteGround has a 30-day money-back policy for your hosting plans, so you can get your money back for your hosting if you changed your mind.
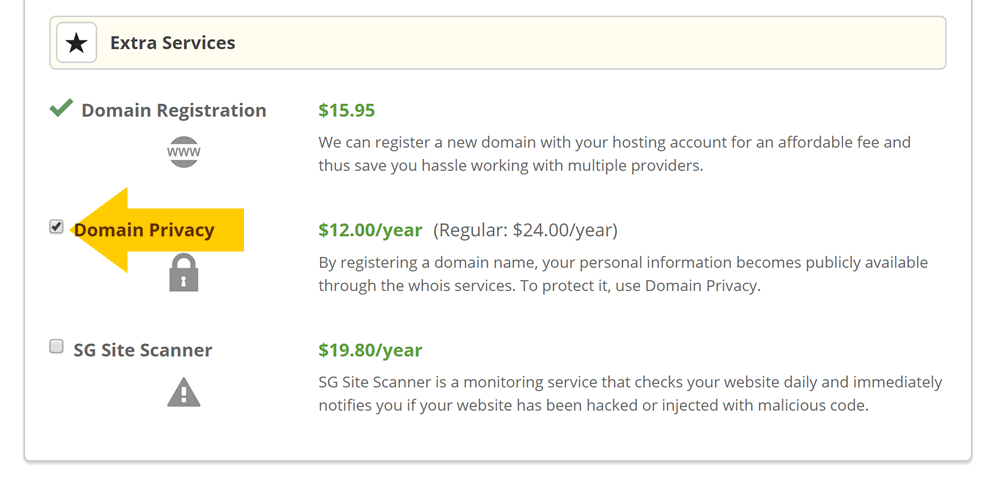
Leave the Domain Registration ticked. This is the name of the website you’ve chosen earlier. Choose ‘Domain Privacy‘ (highly recommended). All website owners are required to have their contact details in the WHOIS public database. This archaic rule was created when there were very few websites in the world and an effort was made to make a phone book with the contact details listed. To get around this, the website hosts offer ‘Domain Privacy,’ which replaces your contact details with the host’s generic contact information and keeps your private data secure. If you have signed up using a business address and a contact phone number, this may not be necessary for most people; however, it is highly recommended.
Choose whether you want an ‘SG Site Scanner.‘ This scans your website for a malicious code and lets you know if you get hacked. Hacking is rare, but all websites are vulnerable to this. When I create a new website, I keep things as cost-effective as possible. However, I’m using this for some of my larger websites. The SG Site Scanner doesn’t stop your website from being hacked; it just lets you know right away if it happens. If you’re on a tight budget, you don’t need to start with that. Tick the SiteGround ‘Terms of Service’ box and click ‘Pay Now.‘ Then, click ‘Proceed to Customer Area.‘
4. INSTALL WORDPRESS AT SITEGROUND
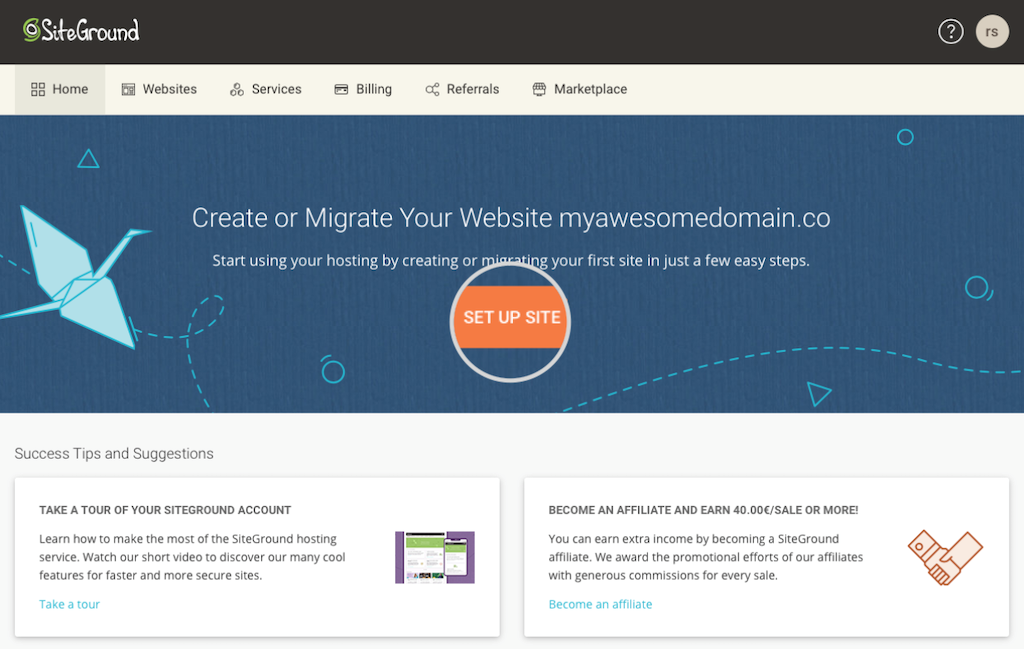
This section of the tutorial shows how to install WordPress on SiteGround. It’s so easy! You will see the following screen when you log in to your new SiteGround account for the first time:
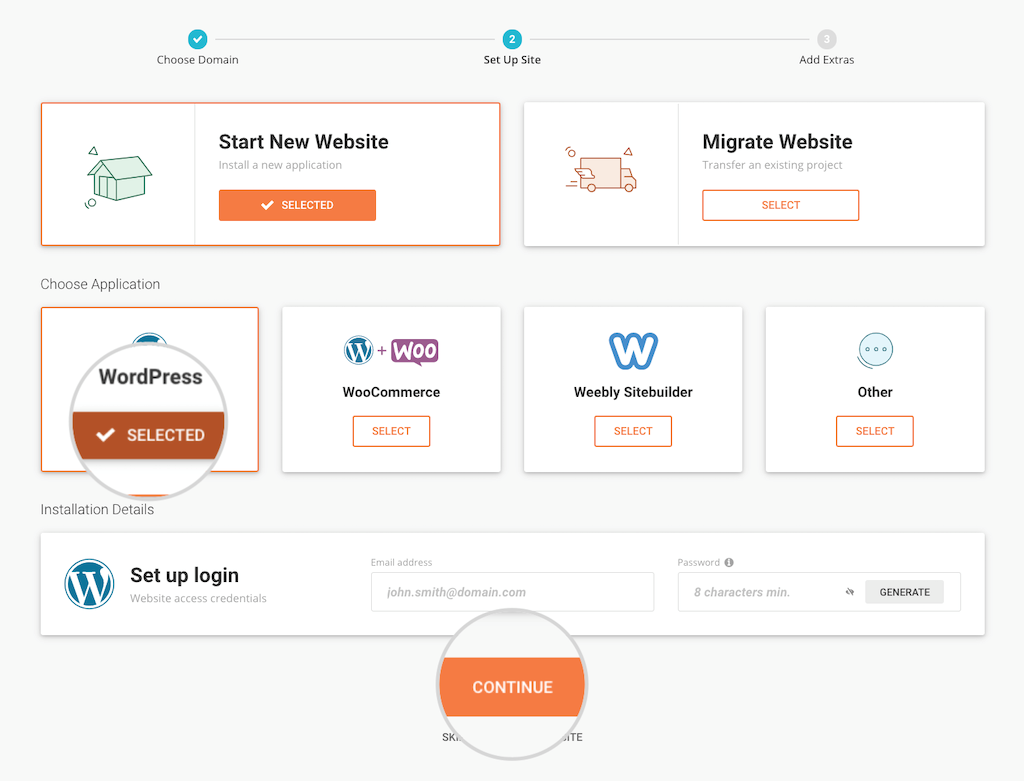
Click SET UP SITE.
Select Start New Website.
Select WordPress. As a reminder: SiteGround is where you store your website files; WordPress is the free software you use to build your website. Click the ‘Continue’ button.
On the next screen, you will be prompted to add additional services if you did not select them earlier. As mentioned above, ‘Domain Privacy‘ is recommended in almost all cases because it keeps your contact details hidden from public view. ‘SG Site Scanner’ is an option.
Select your preferences and click ‘Pay Now‘ (or ‘Finish’ if you do not want to add additional services). This is it! You’ve installed WordPress and now you’re ready to log in!
5. OPEN THE WORDPRESS DASHBOARD
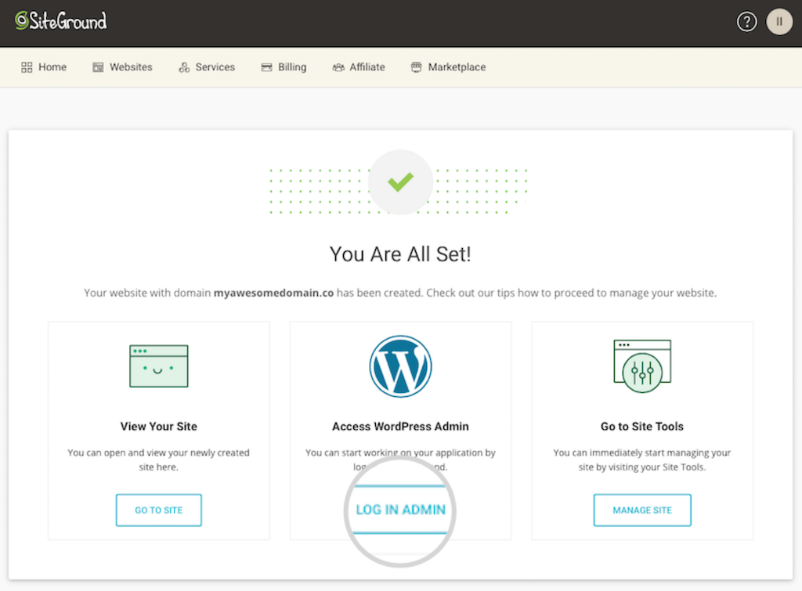
There are three links above the screen. The first link will open your brand-new website, which is already live on the internet! It looks very soft and empty at the moment, of course, because you haven’t customized it or added any content. However, this is a fully functional website that you could use, out-of-the-box, just as it is.
For now, click on the second link, ‘LOG IN ADMIN.’ Doing this will take you to your WordPress dashboard: the place where you edit and add content to your new site.
6. CUSTOMIZE THE APPEARANCE: ADD A THEME
You might want to stop following the tutorial at this stage and just play with WordPress. It’s often the fastest way to learn to play with software. However, for those who would like detailed guidance, the rest of this tutorial outlines how to add pages and content to your website, as well as how to customize your appearance.
Let’s start by changing the theme.
A new theme transforms the appearance of your WordPress site, without affecting the content. In other words, the layout, colors, fonts and style changes, but the text and content remain the same. By default, WordPress comes with a few pre-installed themes. There are thousands of other free themes out there.
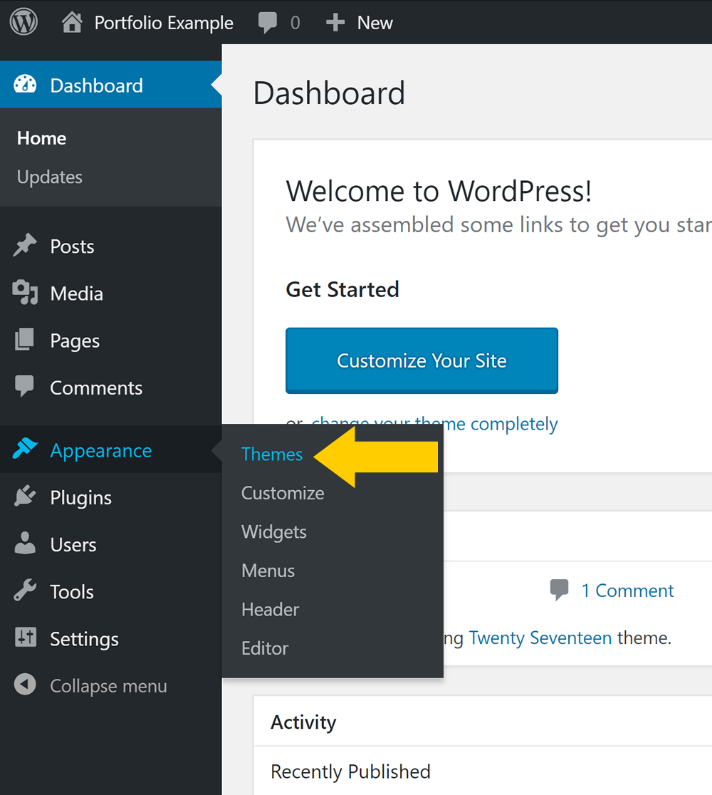
In the WordPress dashboard, go ‘Appearance‘ > ‘Themes‘.
Click ‘ADD NEW’. This brings you to the WordPress theme directory – a collection of thousands of free themes, approved for use with WordPress (be very careful with WordPress themes elsewhere).
Search through themes. When you find a theme you like, click ‘INSTALL’ and then ‘ACTIVATE.’
7. PERSONALIZE THE THEME
There are ways to customize your website far beyond the options described below, but let’s keep things simple for now.
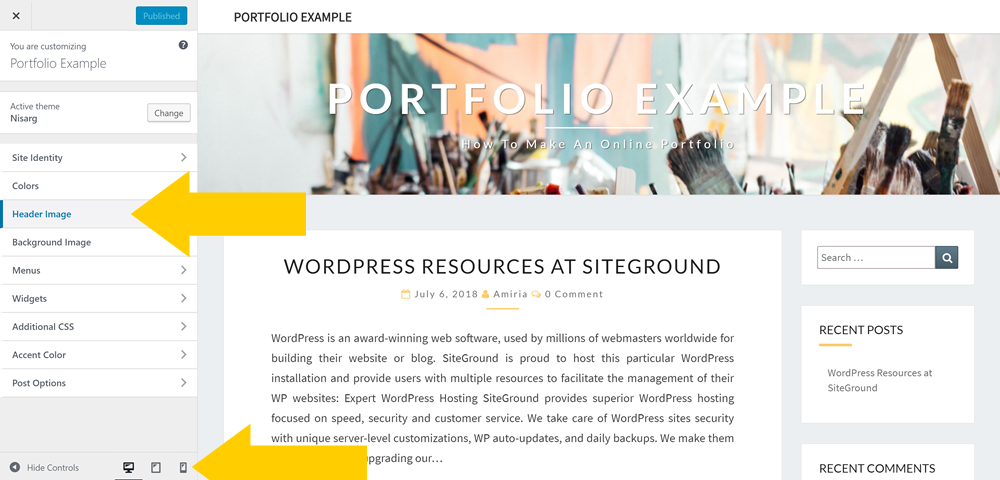
Click the Customize Button. This can be accessed in three places: under the theme, as shown above; in the dashboard menu, under ‘Appearance‘; and in the top black bar, when viewing your website).
ADJUST THE SETTINGS TO PERSONALIZE YOUR WEBSITE. I have added a new ‘header’ image to the screenshot above. Each theme has different customization options available – some are very flexible; others are simple, with fewer options. Do not use the options’ menu’ or ‘widgets’ yet. Check how your website appears on different screen sizes. Once done, click ‘PUBLISH.’
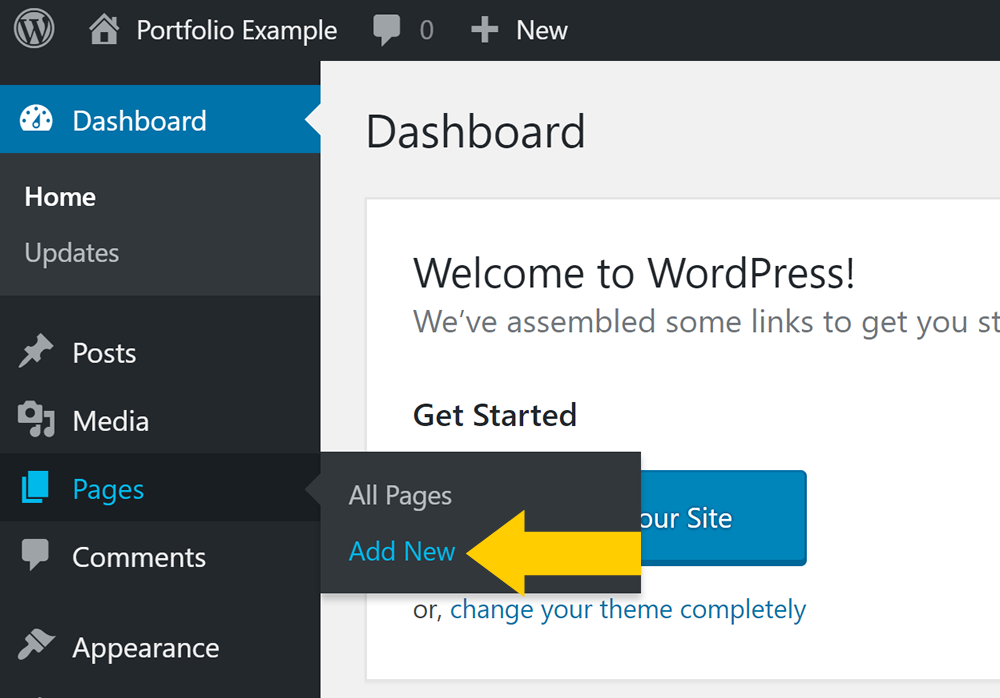
8. ADD A NEW PAGE TO YOUR WEBSITE.
Let’s start by making an “ABOUT PAGE” as an example.
Go to ‘PAGES’> ‘ADD NEW.’
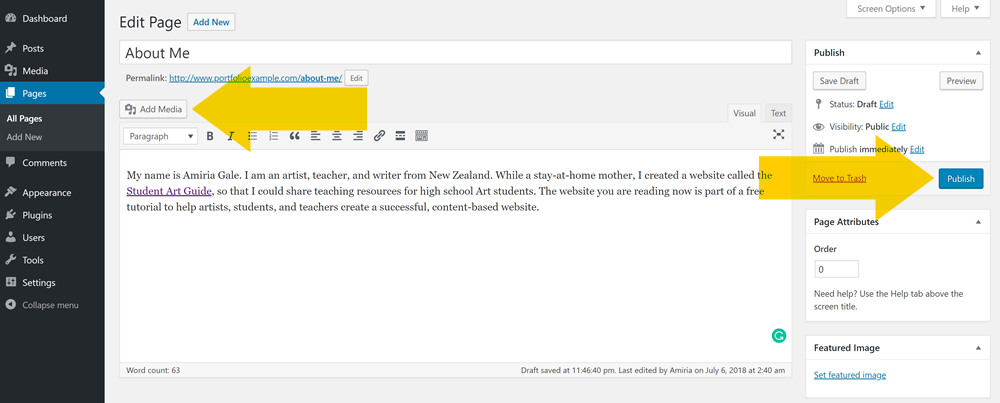
Add a TITLE such as “About Us” or the likes. Then, write a short writeup about your website.
Click ADD MEDIA to add an image.
And then, click UPLOAD FILES and select an image from your computer that you wish to upload.
You may add extra information about the images uploaded, select the display settings. Once done, Click INSERT INTO PAGE and PUBLISH.
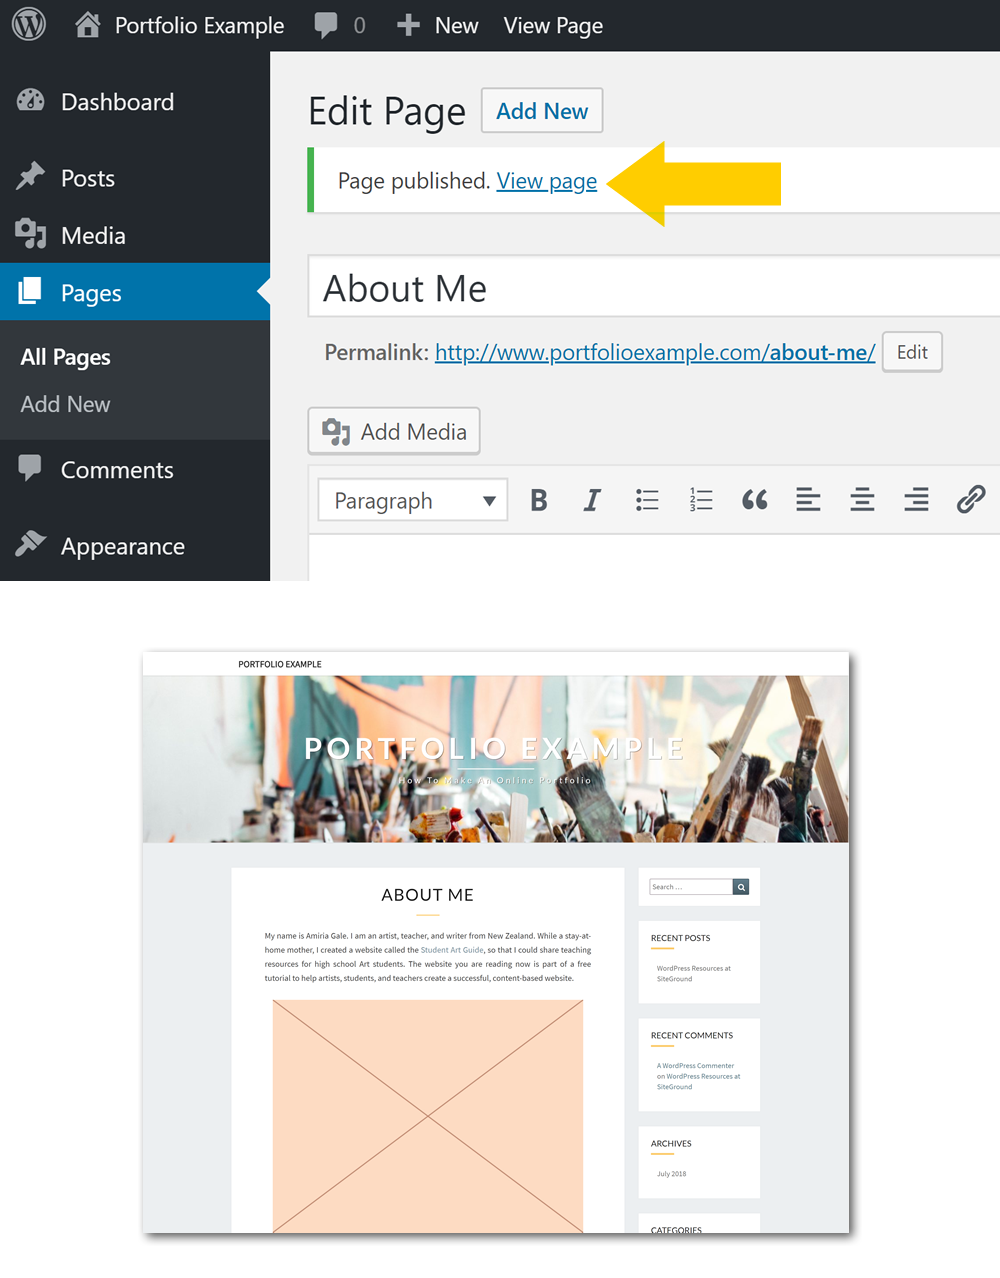
Click the VIEW PAGE link to check your newly created page.
9. ADD A POST TO YOUR WEBSITE
Posts on your website are ideal for most content because they are very easy to arrange. On the other hand, pages cannot be classified, so they do not appear in lists. Pages are useful for stand-alone content, such as a Contact page or About page. Don’t stress too much if all of this sounds confusing; when you use WordPress, it will become clearer.
10. ADD MENU TO YOUR WEBSITE
‘Menus’ lets users access the website from one page to another.
11. ADD AN EMAIL CONTACT FORM
We need a plugin to create a contact type. Plugins are like ‘games’ to phones: they add extra features to the website. Over 50,000 free plugins are available that add contact forms, social media buttons, purchase buttons now and so on. The more plugins you add, the more complex your website is, which makes running slower. I advise not to have more than 20 plugins per account.
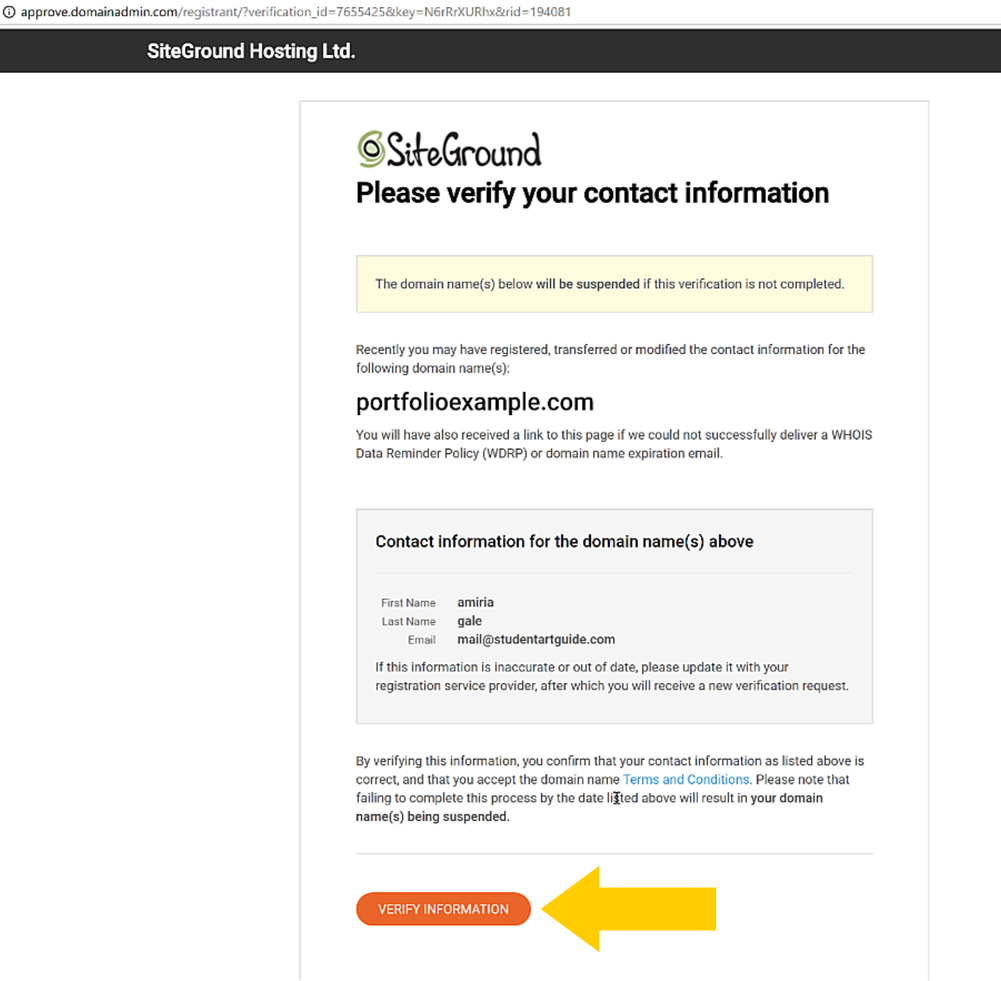
Finally, make sure you have your contact information checked! You will check your contact information to become the proud new owner of your website domain (the website name). It ensures that you are not a spammer and have the exact contact information entered.
Open the inbox. You will have received several emails from SiteGround, such as an invoice and a welcome email.
Click the link in the email. This will take you to the TUCOW INC confirmation screen that supplies SiteGround domains.
Please click VERIFY INFORMATION. Due to recent EU privacy legislation changes, there is now an additional email from SiteGround asking you to confirm your privacy settings. Please follow the instructions in this email. I leave this unticked and click to save, but it’s up to you.
This tutorial is quick and broad, so that you can get your website up and running. For those who would like more help, I am in the process of creating additional tutorials to guide people through the process of customizing the appearance of their WordPress website, as well as how to measure and increase traffic to your website.